OpenAI Assistants API Guide: Building Your Own AI Assistant in Minutes
The future of digital assistants is here, and it’s OpenAI. Their Assistants API empowers developers of all levels to build powerful, personalized AI assistants within their own applications.
Forget clunky, robotic interactions. Assistants built with OpenAI offer human-like conversations, insightful recommendations, and seamless integration with various tools and services. Whether you’re creating a customer service chatbot, a personalized learning companion, or an automated marketing tool, the Assistants API opens a world of possibilities.
But where do you begin? Fear not, intrepid coders! This comprehensive guide will equip you with everything you need to navigate the OpenAI Assistants API like a seasoned pro.
Step 1: Understanding the Core Concepts
Before diving into code, let’s familiarize ourselves with the key building blocks of an Assistant:
- Instructions: These define the personality and goals of your Assistant. Think of them as guiding principles that shape its responses and actions.
- Tools: These are OpenAI-hosted capabilities like code interpreters, knowledge retrieval, and function calling that your Assistant can leverage to fulfill user requests.
- Threads: These represent ongoing conversations with users. Each message exchange adds to the thread, informing the Assistant’s understanding and responses.
Step 2: Creating Your Assistant
Now, let’s get hands-on! Head over to the OpenAI platform and create a new Assistant. Here’s what you’ll need to define:
- Model: Choose the underlying language model powering your Assistant. Options include Jurassic-1 Jumbo, Jurassic-1 137B, and smaller, faster models like Curie.
- Instructions: Craft clear, concise instructions that guide your Assistant’s personality and behavior. Be specific about its goals, tone, and knowledge base.
- Tools: Select the OpenAI tools you want to grant your Assistant access to. For example, code interpretation lets users run code snippets within the conversation, while knowledge retrieval allows your Assistant to search through uploaded documents and provide relevant information.
Step 3: Building a Conversation (One Message at a Time)
Remember those Threads we mentioned? They’re where the magic happens. As users interact with your Assistant, each message exchange contributes to the ongoing conversation. Here’s how it works:
- User sends a message: This could be a question, a request, or simply a statement.
- Assistant processes the message: Your chosen model analyzes the user’s input, drawing on its knowledge base and instructions to understand the intent and context.
- Assistant chooses a response: Based on its understanding, the Assistant selects the most appropriate response. This could involve generating text, calling upon specific tools like code interpretation, or even fetching relevant information from uploaded documents.
- Assistant generates a reply: The chosen response is delivered back to the user, continuing the conversation.
Step 4: Fine-Tuning and Beyond
Your Assistant isn’t just a static creation; it can learn and evolve over time. OpenAI offers several ways to refine your Assistant:
- Fine-tuning: Provide your Assistant with additional training data relevant to your specific domain or use case. This can significantly improve its accuracy and understanding of your target audience.
- Monitoring and feedback: Track your Assistant’s performance and gather user feedback to identify areas for improvement. Continuously iterate and update your instructions and tools to keep your Assistant sharp and engaging.
OpenAI Assistants API: A Gateway to Endless Possibilities
The OpenAI Assistants API is more than just a toolkit; it’s a launchpad for innovation. With its intuitive interface, powerful capabilities, and endless customization options, it empowers developers of all levels to bring their AI assistant visions to life.
So, whether you’re a seasoned developer or a curious newbie, why not dive into the exciting world of OpenAI Assistants? Build your own AI companion, unleash its potential, and experience the future of human-computer interaction firsthand.
Remember, the only limit is your imagination
What are OpenAI Assistants?
A few months ago, OpenAI added new features and plugins to ChatGPT pro users, like the code interpreter and file uploads.
These features were only accessible through the UI and not to developers.
But, with the new Assistants API feature, you can now use the new features through the API!
Think about Assistants as a custom GPT that you can build with some extra powers that are available through the API. This is really super powerful.
How To Create an Assistant?
You can create assistants using the OpenAI Playground (UI) and the API.
1- Using the UI
Let’s start with the simpler approach, which is the UI.
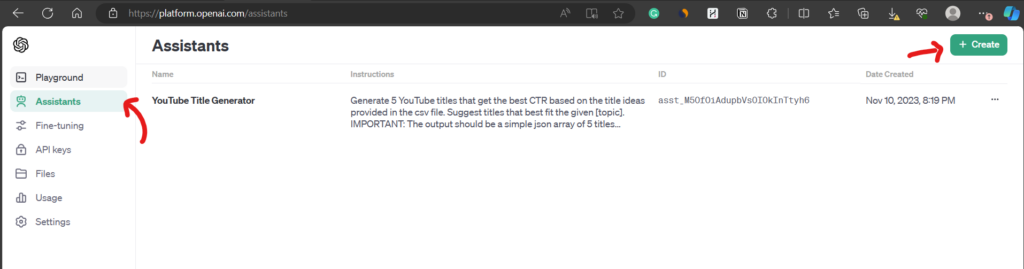
Go to your OpenAI Playground. and click on assistants, then create.
Then you need to fill in the assistant’s parameters and options.
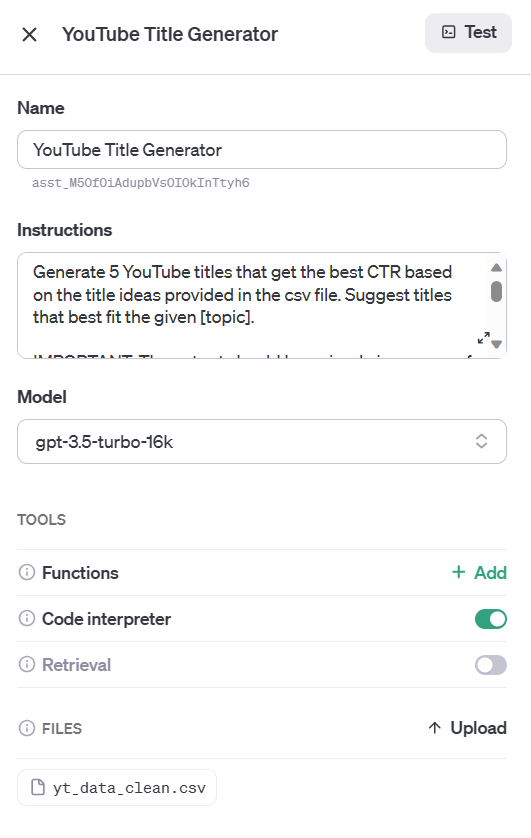
Give it a name, select the model you want to use. and add your instructions.
Think about instructions as the prompt instructing the assistant on what to do.
In an example, let’s create a “YouTube Title Generator” Assitant that helps me generate catchy YouTube Titles for my videos based on a dataset of successful titles and formulas I collected.
So my instruction prompt would be something like:
Generate 5 YouTube titles that get the best CTR based on the title ideas provided in the CSV file. Suggest titles that best fit the given [topic].

IMPORTANT: The output should be a simple JSON array of 5 titles without field names and without anything else!

Example Output:
[
    "Title 1",
    "Title 2",
    "Title 3",
    "Title 4",
    "Title 5"
]
You can see in my prompt there are three main things that you should pay attention to.
- The Task: “Generate 5 YouTube titles“
- Refer to my CSV: “based on the title ideas provided in the CSV file“
- Output format and example: “simple JSON array“
Remember, we will use this in our Python code and build Apps later, so returning a JSON is very important.
Of course, as seen in the Function chains guide, this doesn’t guarantee a valid JSON, and we should follow some more techniques to ensure getting a valid JSON response.
But for now, let’s keep things simple to focus on our concept.
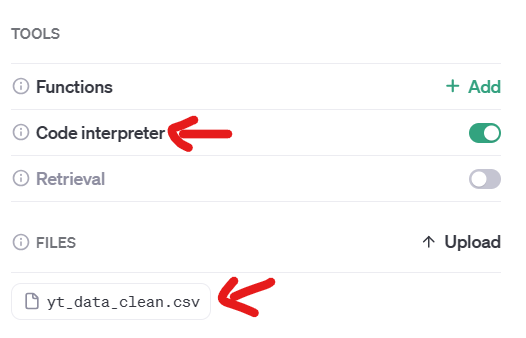
Another important thing you should pay attention to is to check the “code interpreter” to allow the assistant to read data from the CSV file. And, of course, you should upload your dataset file.
That’s it!
You can now test your assistant in the playground.
2- Using the API
let’s build the same example through the API.
First, you need to update the Openai SDK:
pip install --upgrade openai
To Create an Assistant, run this code:
from openai import OpenAI

client = OpenAI()

assistant = client.beta.assistants.create(
    name="YouTube Title Generator",
    instructions="Generate 5 YouTube titles that get the best CTR based on the title ideas provided in the csv file....",
    model="gpt-3.5-turbo-16k",
)
To update with code interpreter and file upload, use the following code snippet:
# Upload the file
file = client.files.create(
    file=open(
        "data/yt_data.csv",
        "rb",
    ),
    purpose="assistants",
)
# Update Assistant
assistant = client.beta.assistants.update(
    ASSISTANT_ID,
    tools=[{"type": "code_interpreter"}],
    file_ids=[file.id],
)
And that’s it! We now have an assistant to call and use anywhere in our code.
Using The Assistant API (Python Example)
To simplify things, I prepared a simple Python script that shows you how to connect and call the assistant in your Python code.
You can copy, replace your openAI api key and assistant ID, and run.
Here we are:
import openai
import time
openai.api_key = "sk-xxx"

assistant_id = "asst_M5Of0iAdupbVsOIO"

def create_thread(ass_id,prompt):
    #Get Assitant
    #assistant = openai.beta.assistants.retrieve(ass_id)

    #create a thread
    thread = openai.beta.threads.create()
    my_thread_id = thread.id


    #create a message
    message = openai.beta.threads.messages.create(
        thread_id=my_thread_id,
        role="user",
        content=prompt
    )

    #run
    run = openai.beta.threads.runs.create(
        thread_id=my_thread_id,
        assistant_id=ass_id,
    )

    return run.id, thread.id


def check_status(run_id,thread_id):
    run = openai.beta.threads.runs.retrieve(
        thread_id=thread_id,
        run_id=run_id,
    )
    return run.status


my_run_id, my_thread_id = create_thread(assistant_id,"[topic]: make money with chatgpt")


status = check_status(my_run_id,my_thread_id)

while (status != "completed"):
    status = check_status(my_run_id,my_thread_id)
    time.sleep(2)


response = openai.beta.threads.messages.list(
  thread_id=my_thread_id
)


if response.data:
    print(response.data[0].content[0].text.value)
This is a very basic example to help you get started. Please optimize and edit as you like.
Now let’s see the real power of using the assistants API.
3 Methods To Make Money With Assistants
Let me share with you 3 Real-world examples of how to turn the assistant APIs into an income stream!
1- Build an AI Tool
Building online AI tools and monetizing them through monthly memberships or credit systems.
2- Build an API
A simpler approach is to create an API and sell on Marketplaces like RapidAPI.
This way, you don’t need to worry about the UI or payment systems. Just publish the API, and sell directly on marketplaces.
3- AI Automation Services
Or what we call AI automation agencies or AI freelancing services.
Now you can build AI assistants for businesses, helping them automate and grow their business with AI.
You can start freelancing, scale later, and create your AI Automation agency.
Whether you want to create AI tools, APIs, or provide automation services. You must first consider developing your skills, like Python programming, data collection, scraping, building automation scripts, and even marketing.
This is why you must dedicate at least 1-hour hour daily to learning these skills.
Otherwise, there will be nothing unique about your work, and you will not be able to compete with others.